Building Microservices with NestJS and Managing Monorepos with Nx
A comprehensive guide to designing, developing, and scaling a maintainable Microservices architecture using NestJS and Nx Monorepo tooling.
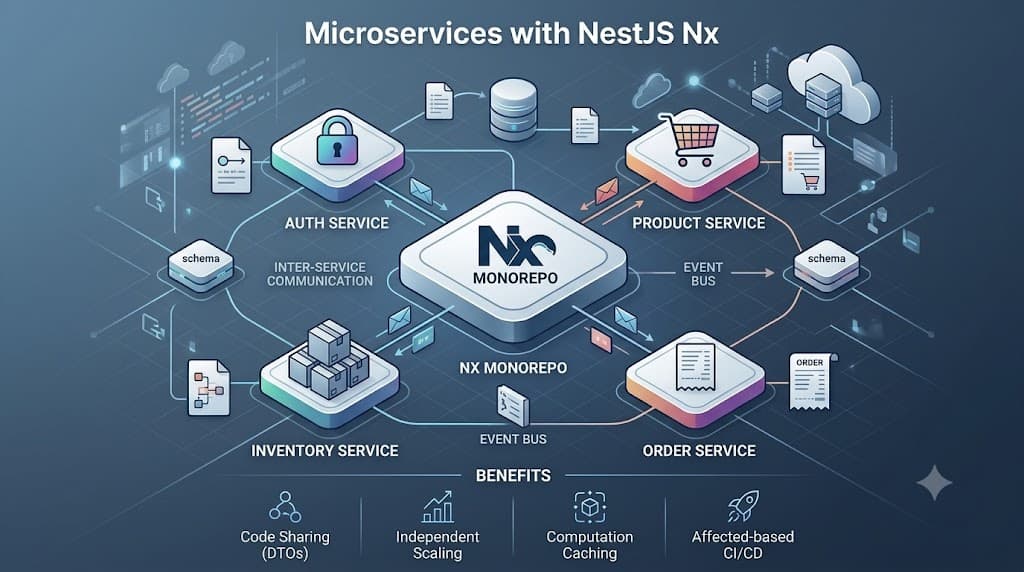
1. Introduction
As modern applications expand in complexity and team size, monolithic codebases often struggle with deployment bottlenecks, tight coupling, and scaling limitations.
The Microservices architecture decouples business domains into independently scalable, maintainable services. Within the Node.js/TypeScript ecosystem, NestJS stands out as an enterprise-grade framework offering modular architecture, structured Dependency Injection, and native support for microservices transports (TCP, Redis, RabbitMQ, Kafka, gRPC).
However, managing multiple isolated git repositories introduces friction: library version fragmentation, duplicated DTOs, and cumbersome multi-repo CI/CD setups. The modern solution to this challenge is Nx Monorepo.
2. Why Combine NestJS with Nx?
Rather than maintaining separate repositories for each microservice, an Nx-powered Monorepo brings critical engineering advantages:
Seamless Code Sharing: Data Transfer Objects (DTOs), validation pipes, database schemas, and shared utilities reside in centralized libraries (
libs/) without requiring private npm package publishing.Smart Computation Caching: Nx tracks file dependencies and code hashes. It avoids rebuilding or retesting unchanged services, slashing CI/CD pipelines execution times.
Interactive Dependency Graph: Visualize service interdependencies and shared library usage instantly via the
nx graphCLI command.Unified Developer Experience (DX): Standardized linting, testing frameworks (Jest/Vitest), and uniform environment setups across all services.
3. Recommended Workspace Architecture
Here is a standard layout for an enterprise e-commerce backend built with NestJS inside Nx:
my-enterprise-workspace/
├── apps/
│   ├── api-gateway/         # Handles public HTTP routes, routing requests
│   ├── auth-service/        # Manages authentication, tokens, RBAC
│   ├── product-service/     # Inventory management, gRPC/Kafka listener
│   └── order-service/       # Checkout workflow, event publisher
├── libs/
│   ├── common/              # Custom interceptors, exception filters, telemetry
│   ├── contracts/           # API interfaces, DTOs, event definitions
│   └── database/            # Database schema, migrations, data-access repos
├── nx.json
├── package.json
└── tsconfig.base.json
4. Hands-on Implementation Workflow
Step 1: Initialize the Nx Monorepo
Generate an empty workspace pre-configured with NestJS support:
npx create-nx-workspace@latest enterprise-microservices --preset=nestStep 2: Generate Applications and Shared Libraries
Use Nx code generators to construct the core modules:
nx g @nx/nest:app apps/api-gateway
nx g @nx/nest:app apps/auth-service
nx g @nx/js:lib libs/contracts --publishable=false
Step 3: Implement Shared Contracts in libs/contracts
Create validation schemas once and share them everywhere (libs/contracts/src/lib/dtos/create-user.dto.ts):
import { IsEmail, IsString, MinLength } from 'class-validator';

export class CreateUserDto {
  @IsEmail()
  email: string;

  @IsString()
  @MinLength(6)
  password: string;
}
Both
api-gatewayandauth-servicecan import this DTO via clean path aliases (@enterprise/contracts) defined intsconfig.base.json.
Step 4: Configure Transport Communication
In apps/auth-service/src/main.ts, expose the microservice via TCP transport:
import { NestFactory } from '@nestjs/core';
import { Transport, MicroserviceOptions } from '@nestjs/microservices';
import { AppModule } from './app/app.module';

async function bootstrap() {
  const app = await NestFactory.createMicroservice<MicroserviceOptions>(AppModule, {
    transport: Transport.TCP,
    options: {
      host: '127.0.0.1',
      port: 8877,
    },
  });

  await app.listen();
}
bootstrap();
In apps/api-gateway, register the microservice client:
ClientsModule.register([
  {
    name: 'AUTH_SERVICE',
    transport: Transport.TCP,
    options: { host: '127.0.0.1', port: 8877 },
  },
])
5. Optimizing Pipelines with Nx Affected Commands
Nx leverages Git history to pinpoint changes across the entire workspace:
Identify affected targets after editing code in a shared library:
nx affected:appsRun tests and builds only for the impacted services:
nx affected -t test --parallel=3
nx affected -t build --configuration=production
6. Architectural Best Practices
Keep Shared Libraries Pure: Avoid putting heavy business state or direct database coupling inside
libs/contracts. Shared libraries should focus on types, constants, and pure functions.Enforce Strict Boundaries: Utilize Nx module boundaries rules (
@nx/enforce-module-boundariesin ESLint) to ensure services cannot directly import other services' internal logic.Distributed Tracing: As request flows cross network boundaries, implement centralized tracing using tools like OpenTelemetry and structured logging within
libs/common.
Pairing NestJS with Nx creates a cohesive ecosystem that preserves the autonomous benefits of Microservices while maintaining the code velocity and simplicity of a single repository.